This DIY Hooch Recipe Pairs Beautifully With Whatever’s Around The FOB
Ever since man learned that half-rotted fruit, under the right conditions, could make it easier to talk to women, humans...
Ever since man learned that half-rotted fruit, under the right conditions, could make it easier to talk to women, humans have been enjoying booze in every way possible — from the vineyards of France to whatever industrial wasteland churns out MD 20/20.
But what if you find yourself in a place where it’s not easy to get alcohol? Maybe one of the many dry counties across the United States, or maybe even in a combat zone on the other side of the globe? Then you have to MacGyver that hooch.
The following is an easy-to-follow vino recipe, using items that are suspiciously easy to secure if you find yourself in certain dry territories for a year or so with a bunch of your closest workout buddies and no post exchange selling 30-racks of Natural Light.
Note: I am in no way telling you to break General Order No.1, or any other regulation. I’m just showing you a cool recipe for tasty wine from a few ingredients that are as easy to find in a Kandahar PX as in a Walmart outside King's Bay Naval Base on a Sunday.
What you need
If you find yourself in an inconvenient spot to buy a grownup drink, and you’d prefer something with a sweeter bouquet than Listerine, here are some things you can buy instead.
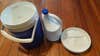
Last time I was in an overseas post exchange, we easily found five-gallon water coolers, with spigots at the base for filling bottles. Below, you’ll see a two-gallon variant:
Francis Horton

The most important thing about this particular cooler is the burp valve at the top. This lets water drain smoothly out of the spigot, as it’s replaced by air from above. That makes for a much smoother pour into your water bottle — and it is essential to making wine.
Francis Horton

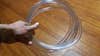
Next up is some rubber tubing. This is mostly used by brewers and can be easily bought on Amazon. Nothing illegal about rubber tubes overseas! Look for “food grade” vinyl tubing with an inside diameter of 5/16 of an inch, and an outside diameter of 7/16 of an inch.
Francis Horton
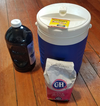
Juice can be bought anywhere… or carried out of a dining facility, box by box. You’ll also need sugar and a packet of activated yeast. I’m going cheap with the Fleischmann’s yeast, but you can have someone send you a care package with a few packs of champagne yeast from your local grocery store. No one says you can’t be fancy in a war zone!
Francis Horton
Prepwork
First, clean that cooler really well. A capful of bleach mixed with a gallon of water is best, but not absolutely necessary — dish soap will work, too. Be sure to clean the underside of the lid as well. Rinse it thoroughly and make sure to run clean water through the spigot at the bottom.
Francis Horton
The Mix
Fill the cooler halfway with juice, then add the sugar — one pound of sugar for each gallon of juice. Four-pound bags of sugar are pretty standard, so if you get a five-gallon cooler, one bag of the sweet stuff will do fine. But do not use sugar substitutes. What’s going to happen is, yeast will eat the sugar and crap out delicious alcohol. Yeast cannot live on Splenda alone.
Francis Horton
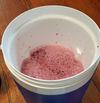
Fill the cooler the rest of the way with water. Leave about an inch of free space at the top and stir the mix well. You should not be dredging any granulated sugar from the bottom.
When you can drag the bottom and not pull sugar up, you’re in the clear.
Francis Horton

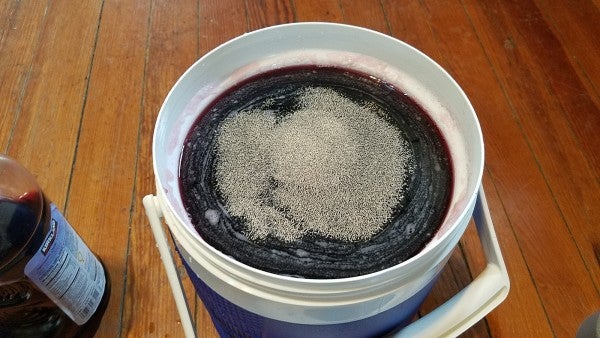
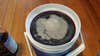
Sprinkle about half your package of yeast on top. Don’t stir it in; just leave it there and let it do its thing.
Francis Horton
Finishing up
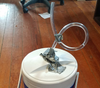
Remember that burp valve I mentioned earlier? Time to pop it off:
Francis Horton

Next, fix a length of your tubing in place over the open valve. You may need to notch a small cut in the end of tubing to make it fit over the little valve opening at the top. Make sure you have about 16 inches of tubing.
Francis Horton

This is going to be your bubbler. While the yeast goes to work, it’s going to create gas that needs to be released from the container, so the internal pressure doesn’t build up. But while you need gas to get out, you can’t have any getting in. Hence the tubing.
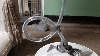
Grab your trusty roll of hundred-mile-an-hour tape and secure the tubing in place. You don’t want it going anywhere. Then twist a simple loop in the tubing and use a bit more tape to keep it sturdy, like so:
Francis Horton
You want to get a small amount of water to rest in the tubing’s bend. This will keep the system closed… until some gas from the fermenting yeast needs to burp its way up, squeezing past the water valve. You’ll see it really start to work in about a day:
Francis Horton
You’ll probably smell it even sooner.
Eventually the bubbling will stop. Leave everything in place for about three weeks. There’s still lots of fermenting the wine will be doing, and ample time gives the mix a chance to really get a full-bodied flavor that pairs well with any beef MRE.
Francis Horton
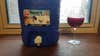
Ah, the gentle pour of your first home-hacked wine. Have you ever wondered if there can be any wine worse than Two Buck Chuck? You’re about to get an answer. You’re welcome.
Francis Horton

Kick back and enjoy! It gets better after the third glass. Well, not better, but it stops mattering, really.