The best iron sights you can count on for accuracy
Iron sights aren’t just for establishing “back in my day” bragging rights.
| Best Overall |
|
Ultradyne C4 | SEE IT |
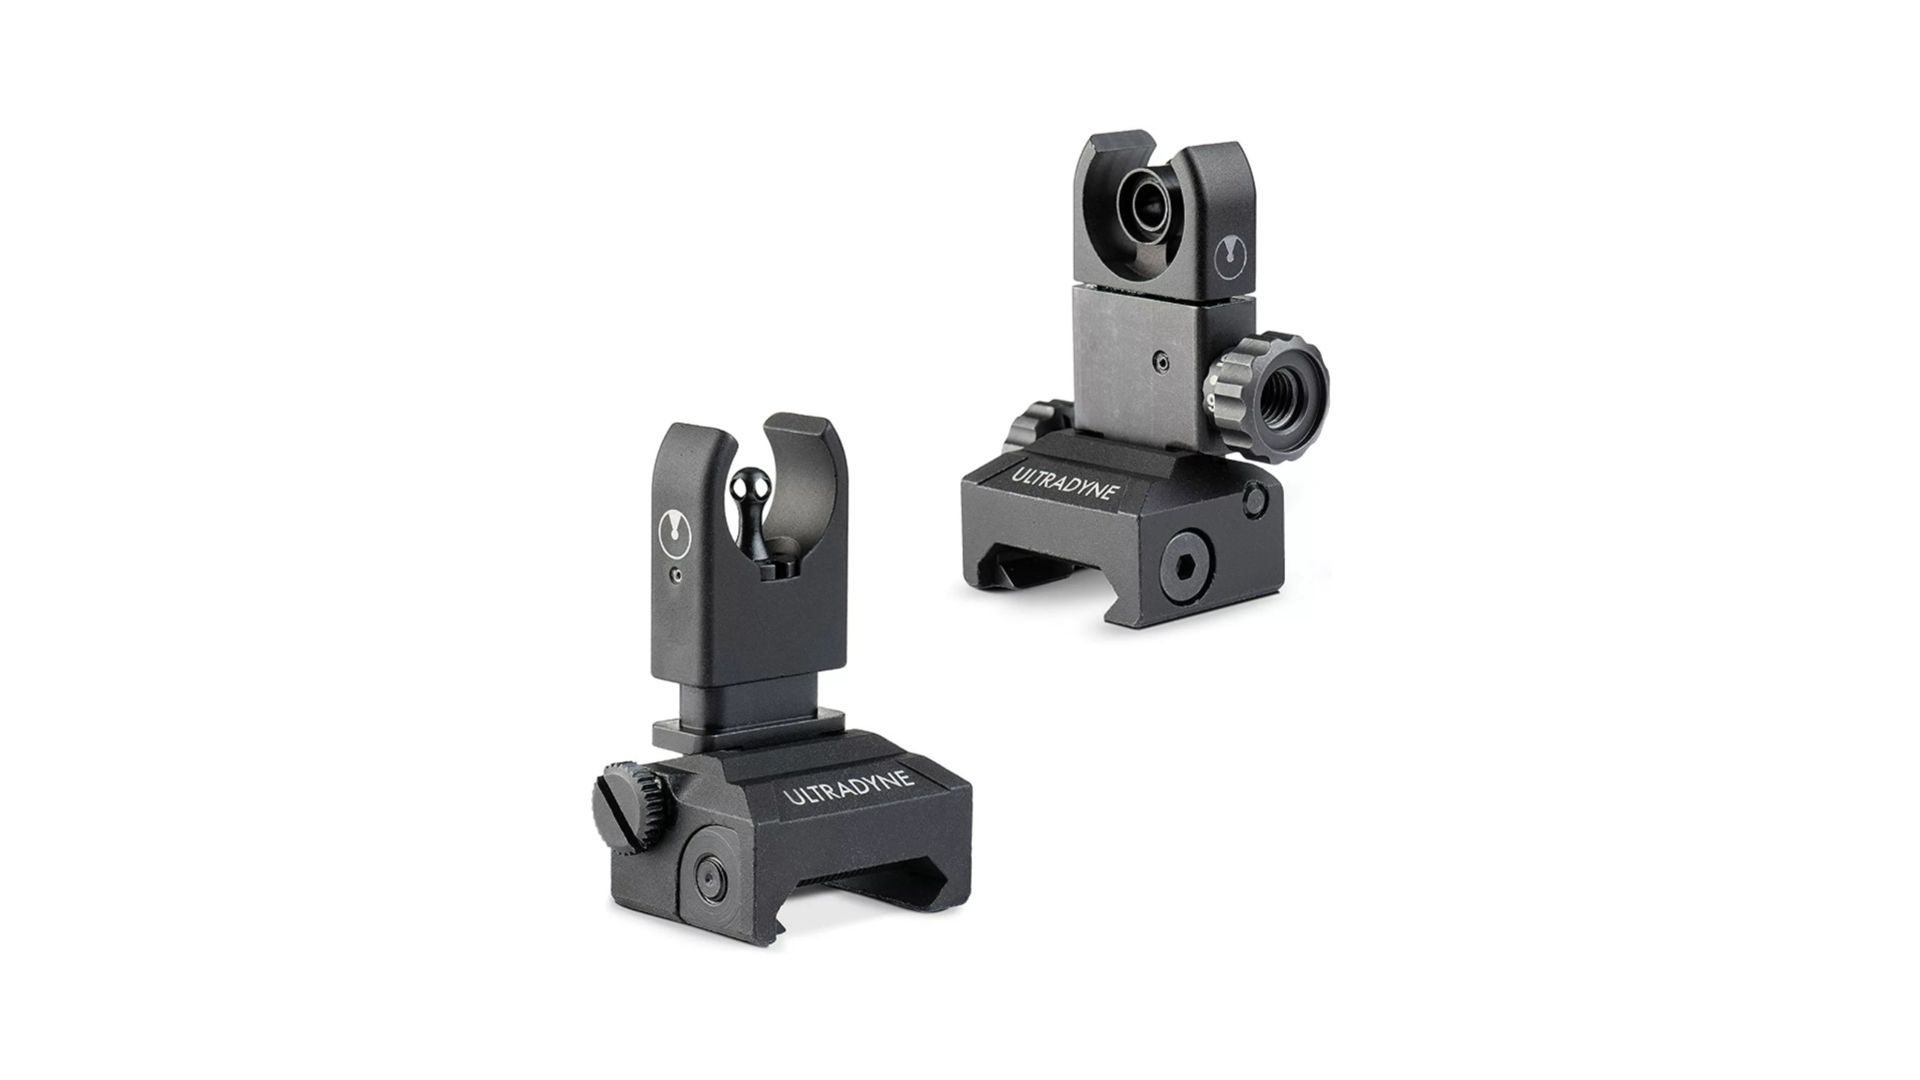
The best overall award has to go to a product that works for just about everyone. We love the flexibility and innovation of the Ultradyne C4 backup iron sights. |
Pros
|
Cons
|
|
| Best Value |
|
Magpul Industries MBUS II | SEE IT |
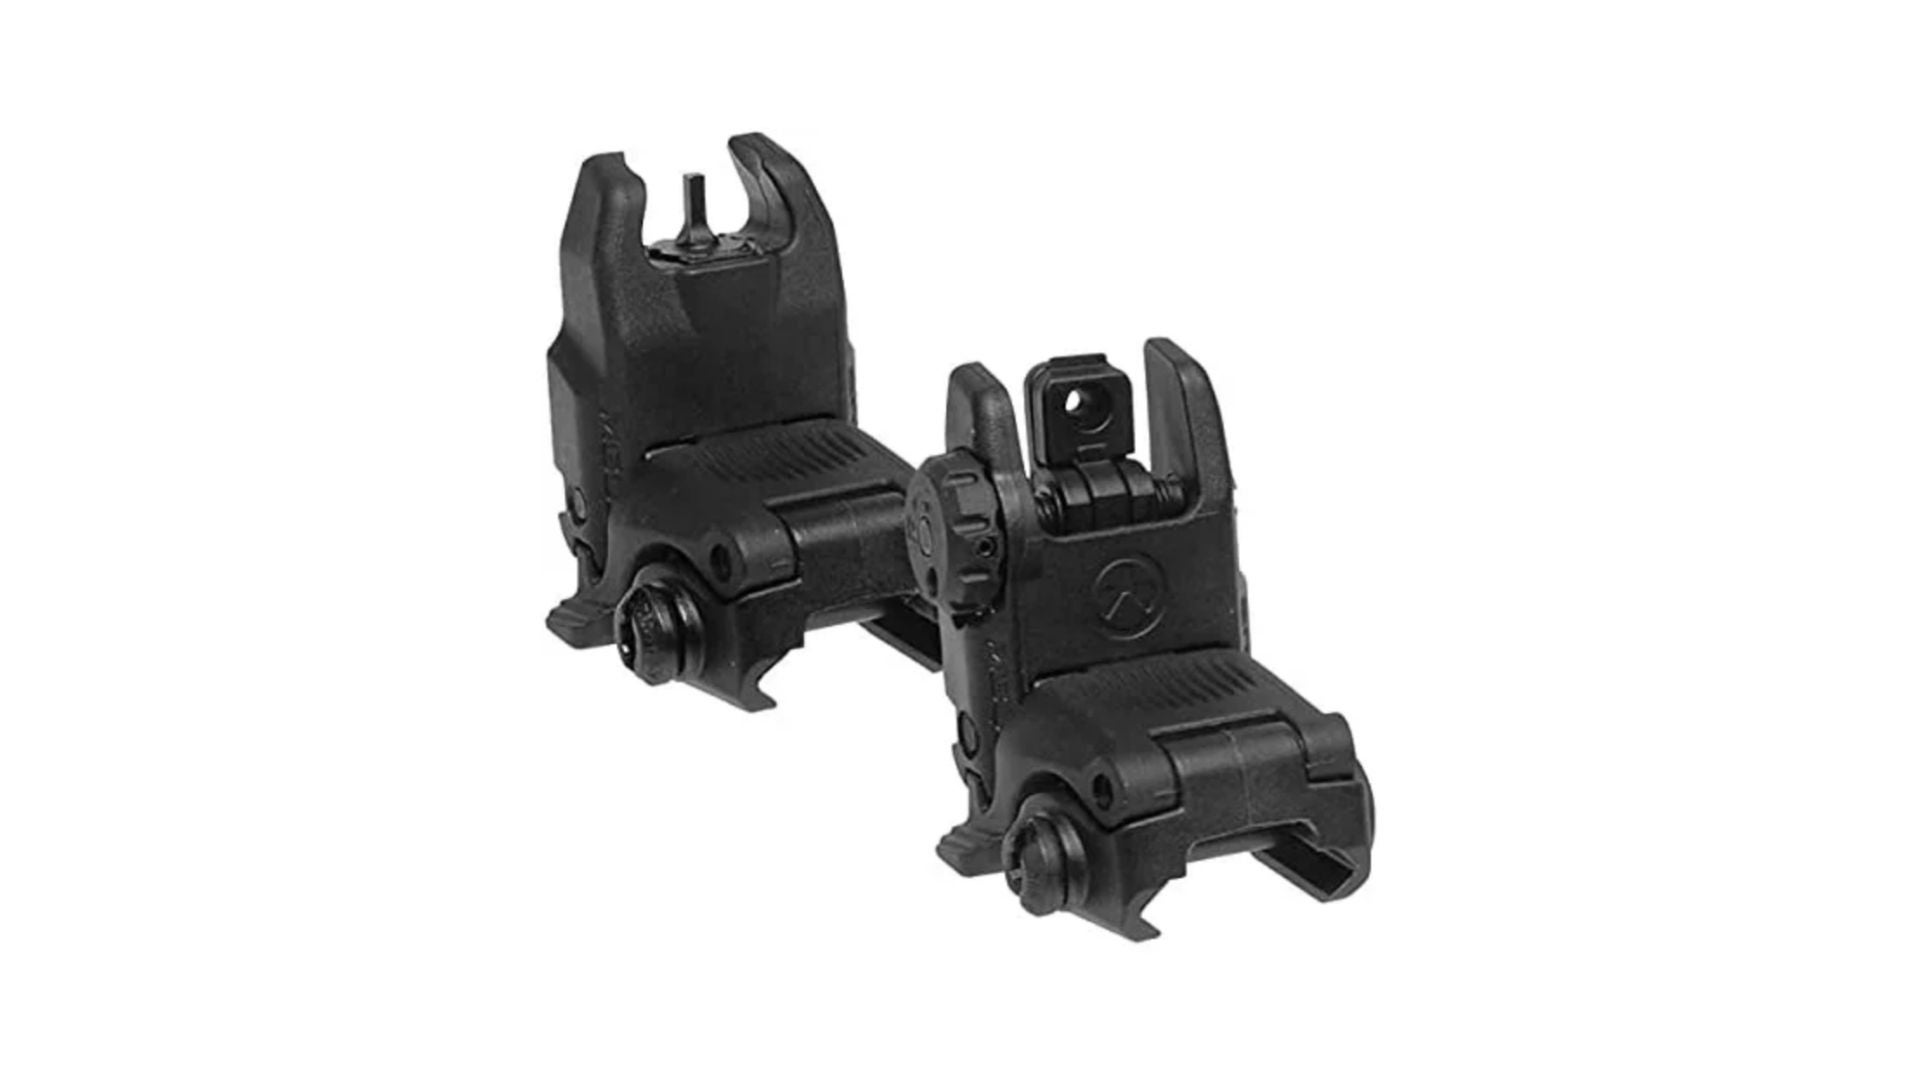
The MBUS II is a powerhouse in the iron sight market for a reason. It’s a serviceable backup that won’t break the bank. |
Pros
|
Cons
|
|
| Editor’s Choice |
|
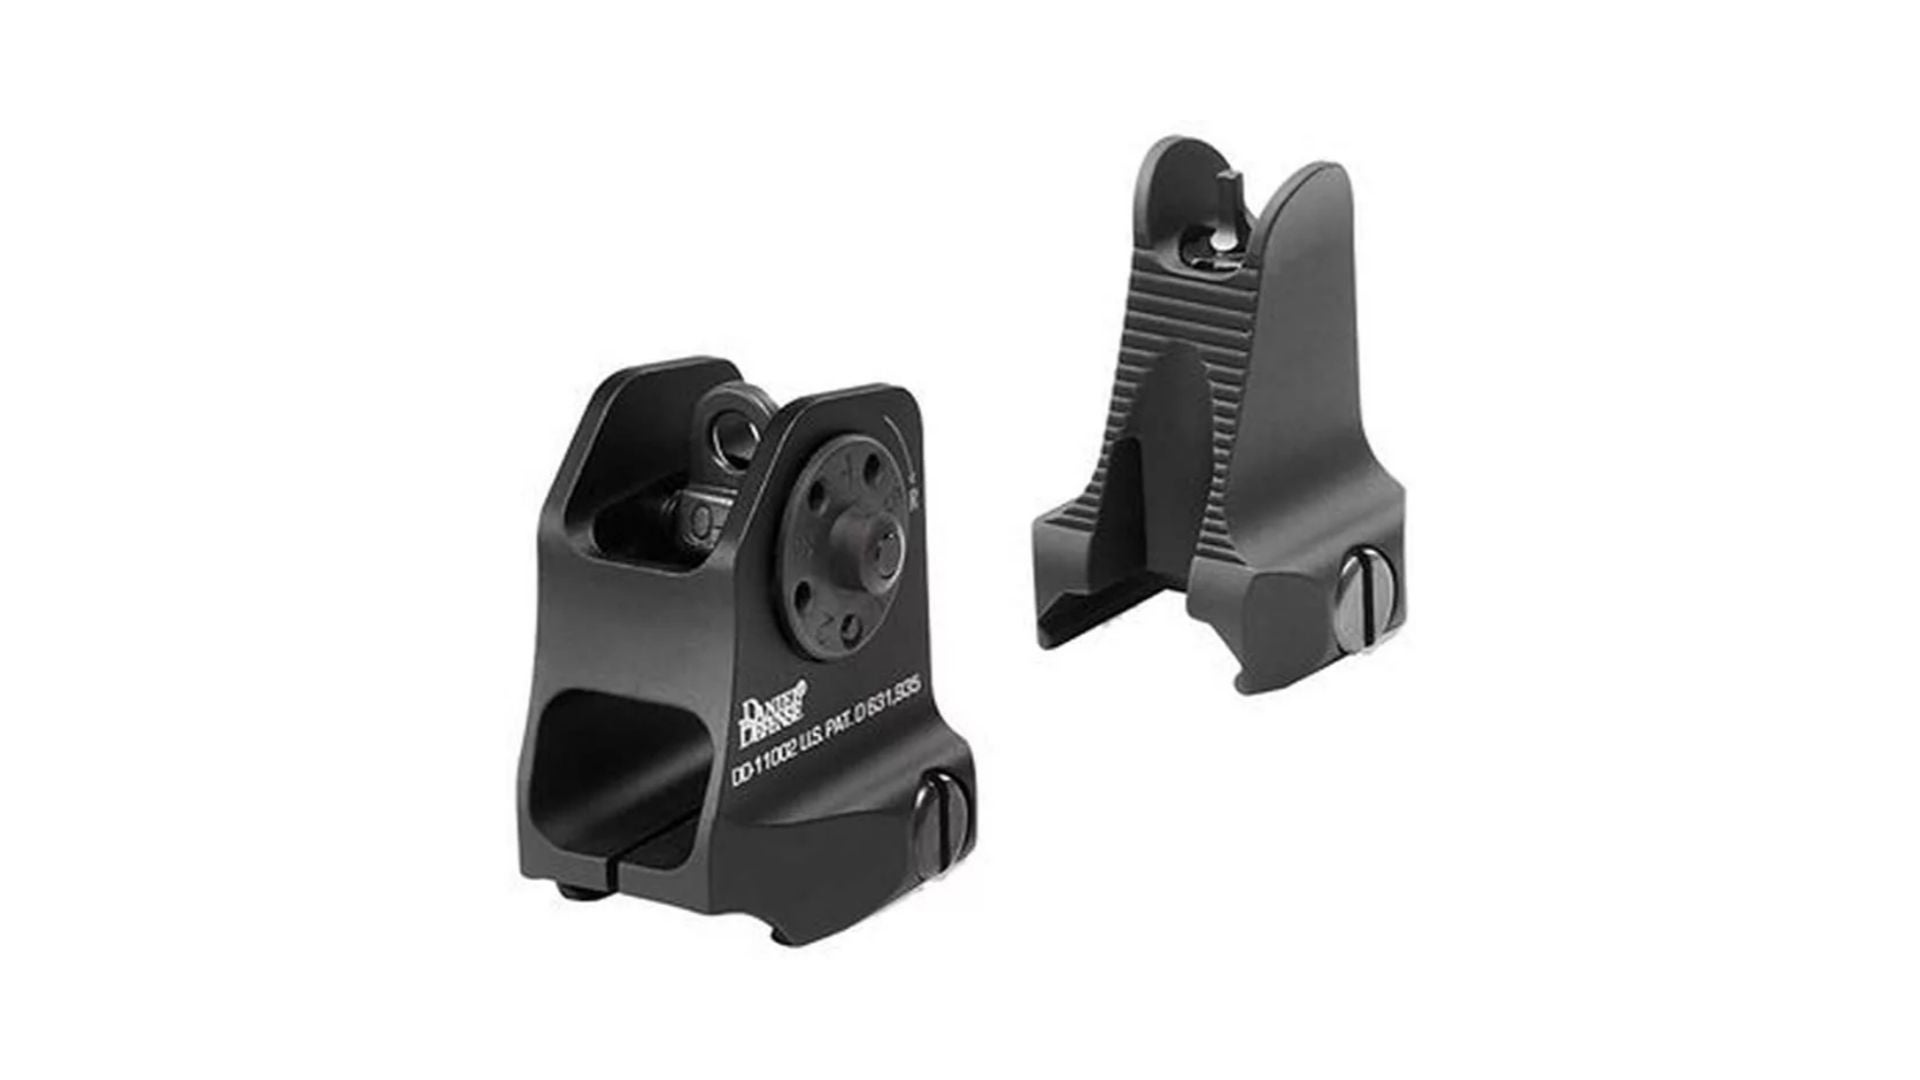
Daniel Defense Rock & Lock AR15 Iron Sights | SEE IT |
Daniel Defense has a home run for shooters who want a simple, reliable, high-quality set of fixed iron sights. |
Pros
|
Cons
|
We may earn revenue from the products available on this page and participate in affiliate programs.
Backup iron sights — and primary iron sights, for that matter — are an important part of many rifle setups. Slapping a pair onto the top rail of an AR is so easy and affordable that it’s hard to argue against doing just that. While we cover a lot of the latest and greatest cutting-edge gear here at Task & Purpose, a recent range day saw commerce editor Daniel Terrill and I getting reacquainted with iron sights and a 20-inch barrel — and it felt just like old times.
For the purposes of this guide, we selected some of the less common options to try alongside the tried and true A2 carry handle we grew up on during our respective time in the Marine Corps. On the test bench for this gear guide were the UTG Mil-Spec Carry Handle, Trijicon CP250 replacement sights, and Ultradyne C4 backup iron sights. Of course, there were also a few easy selections like the Magpul BUIS and Daniel Defense Rock & Lock AR-15 Iron Sights.
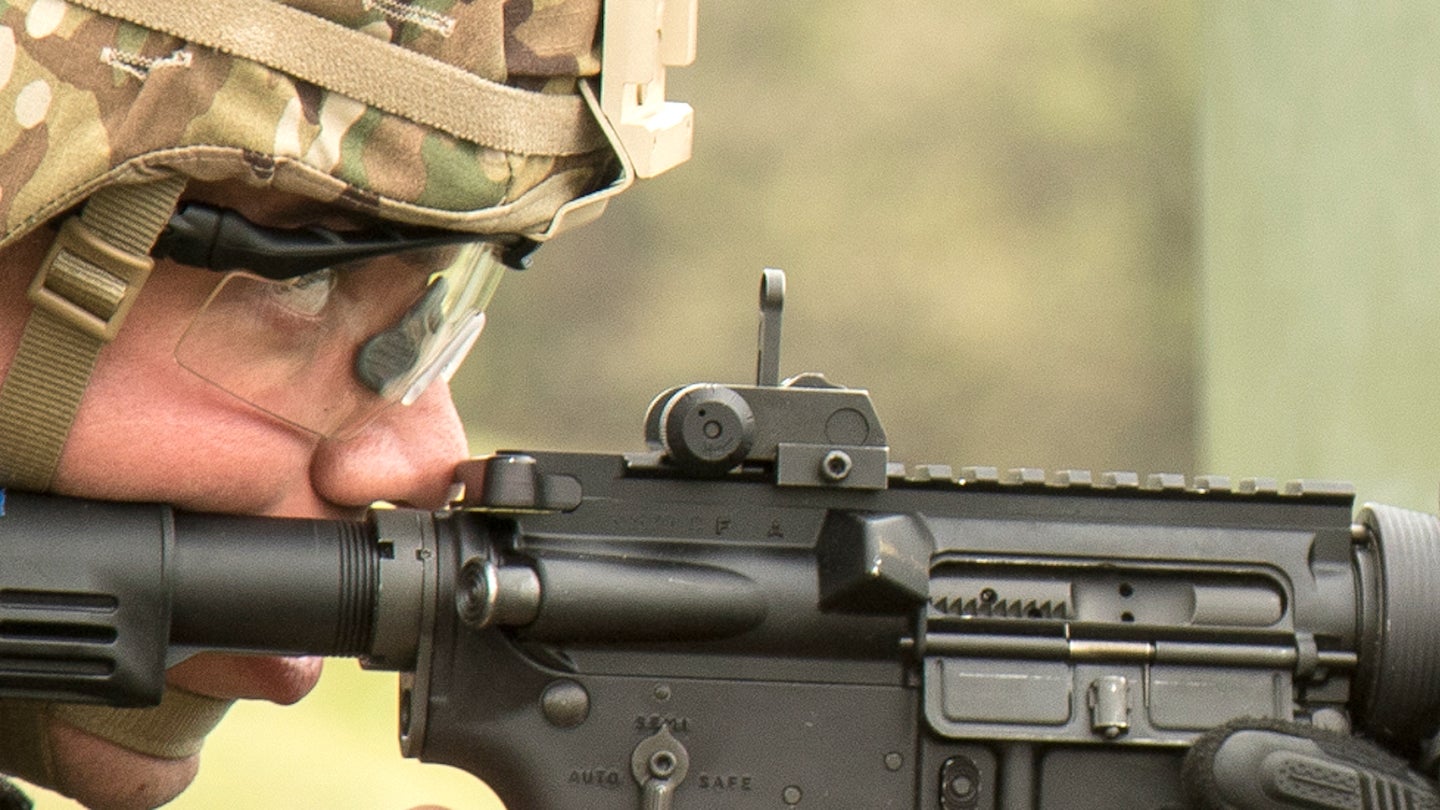
Our assistant for the day was the Smith & Wesson M&P 15 Volunteer VX DMR. The M&P 15 is one of the most popular ARs in the U.S., partially because of the model’s accessible price of entry. The entry-level M&P 15 Sport II starts at an MSRP of just $788. Of course, many bargain-basement ARs don’t stay in stock very long. One of the first things owners do is start upgrading low-hanging fruit like the trigger, bolt carrier group, charging handle, and furniture. The Volunteer VX DMR takes the work out of customizing a new AR-15 with key upgrades like a PWS 556 muzzle brake, B5 Systems stock and pistol grip, Radian Raptor-LT charging handle, and flat-faced trigger. Add options like the 20-inch barrel and flip-up irons, and the result is a rifle that’s ready to rock out of the box with a starting MSRP of $1,599 as tested.
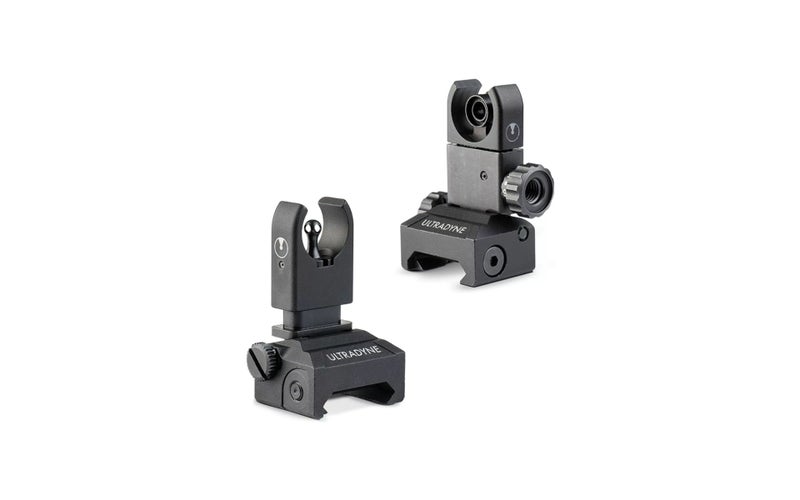
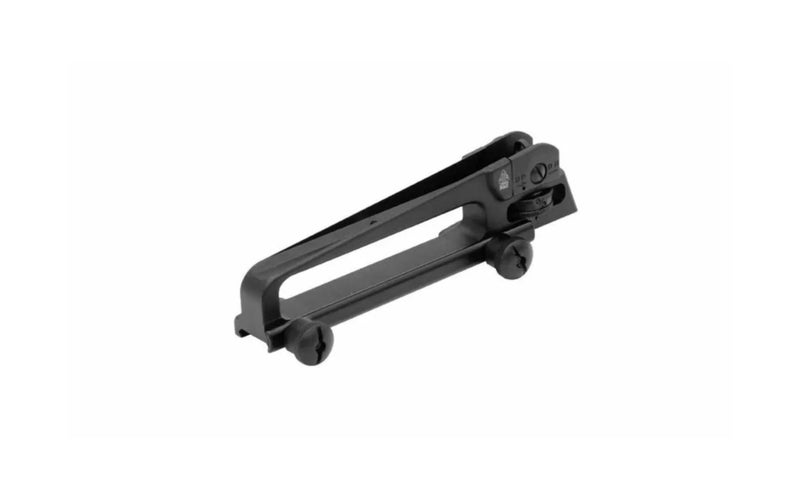
When I did my initial search for iron sights, the Ultradyne C4 caught my eye immediately. With a front sight post that’s capped with an aperture rather than a flat top, it was like nothing I’d ever seen. I couldn’t decide if it was a sales-grabbing gimmick or a stroke of genius, so I got Ultradyne on the horn and had a set sent out for testing.
It turns out that the aperture isn’t the only unique part of the C4. My front sight post adjustment tool turned out to be unnecessary because the spring-loaded shroud just has to be pressed down to allow the post to rotate and move the point of impact vertically — very clever. Doing so requires deliberate force, but it is worth remembering that it could be possible to damage this mechanism in the field.
The rear sight offers the usual horizontal adjustment knob. There’s also an elevation knob with settings every hundred yards from 200 to 600 yards. Markings are clear and easy to read at a glance. The rear aperture itself can be removed by unscrewing it to leave a wide night sight aperture. This is definitely not as convenient as a traditional combination aperture that rotates forward and back, so keep that in mind if you find yourself doing a lot of night work. I wouldn’t want to have to keep track of that tiny insert in the field.
Since our range day involved constantly switching sights, we stayed at 50 yards — where a lot of shooters establish a zero. My first shots with the C4 sights overlapped so much that I thought it was a single hole until I was about a foot away from the target. The dual aperture system took some getting used to, but I adjusted quickly and ended up really liking it. It actually made me wonder why nobody thought of this before.
Ultradyne’s C4 sights took the top spot for this gear guide by being fast, accurate, and easy to use. They also feel very solidly built — as they should with an asking price of nearly $300. That price tag is going to turn off a lot of shooters, who just want an affordable insurance policy for their primary red dot or LPVO. Those of you who appreciate being able to knock down targets with nothing but cold steel in front of our eyes will love them, though.
- Configuration: Rear aperture/front aperture
- Placement: Vertical (flip-up)
- Adjustments: Rear windage and elevation, front elevation
BUIS that are compatible with most optics
Why didn’t anyone think of making a front sight aperture before?
Having preset elevation adjustments is a must for many shooters
Sights sit nice and low when folded down
Looking through the front sight feels strange at first
Front sight shroud could be a vulnerability under hard use
Changing the rear sight aperture on the fly is a hassle
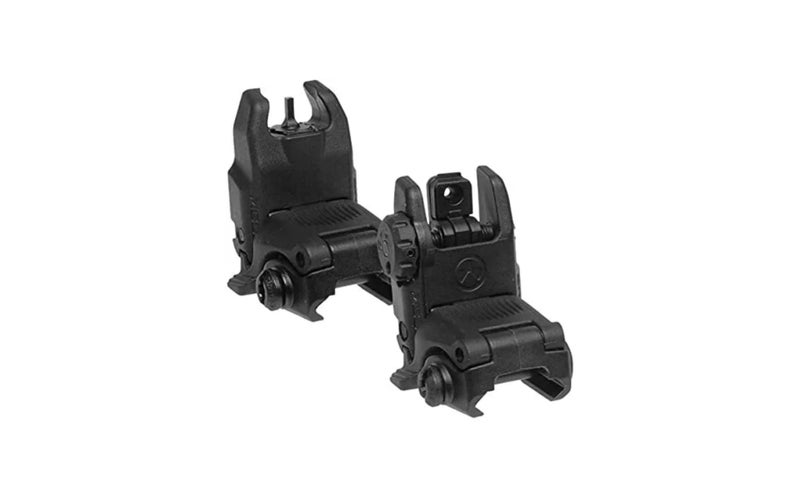
There’s no way to know for sure what percentage of AR-15s have a set of Magpul MBUS iron sights mounted to them, but we’re willing to bet it’s up there. Magpul is one of the biggest names in AR accessories and its backup iron sights have been a power player for years.
These sights are unique on this list because they’re the only iron sights that aren’t made out of metal. Instead, they’re made from Magpul’s durable injection-molded polymer, and the result is a combined weight of 2.5 ounces. Because there’s no finish applied, scratches won’t reveal shiny metal scars like they would on anodized iron sights. Installation is easy and each sight snaps into place with the press of a button.
Shooting with the MBUS II (or any other series of the Magpul MBUS, for that matter) is just like using any other combination of a peep sight and front sight post. The rear aperture can be flipped between a standard, tight aperture and a larger aperture that’s useful for snap-shooting and low-light situations. The main limiting factor is a lack of adjustment for elevation on the rear sight. While the MBUS II is great for close-range shots in the event your primary optic goes down, the practical range is limited to about 200 yards, depending on your zero. Some people will be turned off by that, but most will never shoot that far with backup sights, anyway.
The most common criticism of the MBUS II is probably its use of polymer instead of metal. It’s inexpensive, less refined than machined metal, and feels flimsy if you aren’t used to it. Our response is to point out that those critiques sound a lot like the early reception of Eugene Stoner’s original ArmaLite AR-15 — and we all know how that turned out. No, these sights aren’t going to win you any long-range marksmanship awards. They’re for people who already have a primary optic and want a little reassurance without blowing the budget. If that’s you, look no further.
- Configuration: Rear aperture/front sight post
- Placement: Vertical (flip-up)
- Adjustments: Rear windage, front elevation
Release of the MBUS 3 will make these even more affordable
Add backup sights, not excess weight
Installation and operation are straightforward
Polymer is unaffected by moisture
Feels cheap compared to metal sights
Rear sight is not adjustable for elevation, limiting range
More susceptible to extreme heat than metal sights

Flip-up sights are great, but there’s still a place in this world for fixed iron sights like this Rock & Lock set from Daniel Defense. Maybe you want to use irons as your primary sight; maybe you want to co-witness with a red dot. In either case, these are the sights for you.
The Rock & Lock sights occupy a useful middle ground between flip-up irons and the clunky A2-style carry handle. The aircraft-grade aluminum is extremely durable without being overly heavy — in fact, these sights add just a fraction of an ounce compared to Magpul’s polymer MBUS system. Elevation adjustments can be made on the front sight post, and quick adjustments for windage can be made at the rear.
The high profile of these sights should make it easy to get a proper sight picture without hunching down over the gun. Using them will be instantly familiar to anyone with time on old-school A2-style sights. The rear sight includes apertures for day and night shooting and a large knob for rapid windage adjustments. Like many backup iron sights you’ll encounter, the lack of elevation adjustment at the rear limits the effective range of these sights. This won’t matter for run-and-gun shooting in a bay, but don’t expect to reach very far on a known-distance range.
We love how durable these sights are. As with everything that comes from Daniel Defense, build quality is clearly a priority and we’ve seen plenty of people knock these sights around with hard use and the reviews are positive. The lack of rear elevation adjustment is a bummer, especially at this size. For that reason, we recommend these as primary or co-witness sights for AR pistols that won’t be asked to perform beyond 200 yards. Zero them properly, and targets inside that distance should be fair game — no batteries required.
- Configuration: Rear aperture/front sight post
- Placement: Vertical (fixed)
- Adjustments: Rear windage/front elevation
Overbuilt to an extreme degree
High profile results in easy sight picture acquisition
Set-and-forget simplicity for short-range shooting
Unbeatable reliability that you can count on no matter what
Elevation adjustment is only possible on the front sight
High profile isn’t streamlined enough for some shooters
Expensive, considering the limited adjustability
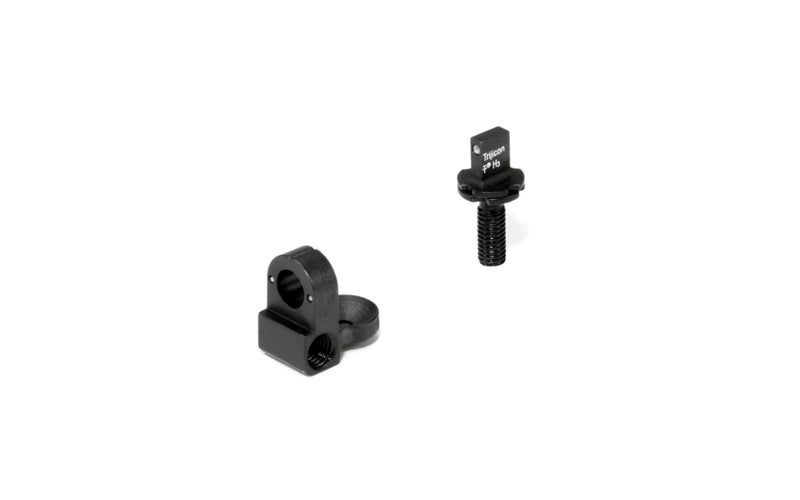
One of the reasons the AR platform is so popular is its nearly limitless potential for customization. With basic tools and mechanical aptitude, you can swap out bits and pieces as time and money allow you to create a firearm that’s built exactly the way you want it. When it comes to choosing sights, you can modify even further than simply choosing which set of irons you use. Go ahead and swap out the guts with upgraded goodies from Trijicon, while you’re at it.
On one hand, these sights are pretty self-explanatory. They’re a rear aperture and front post that can be installed into your existing sights. If you’ve looked through a set of peep sights, you know what to expect. The difference is in three tiny tubes of tritium; one in the front and two in the rear (alongside the wide aperture only). The radioactive material, similar to what’s used in military compasses, stays illuminated for decades without any need to charge with an external light source. That means your night sights are ready to rock any time, any place.
We didn’t have a chance to do any night shooting, but the concept is simple enough to vouch for. The tritium works. The sights are otherwise the same style in most iron sight setups. The main difference (aside from the tritium) is the fact that the front post needs to be turned in 180-degree increments rather than the usual 90 degrees.
The Trijicon Bright & Tough sights are a sophisticated choice for the discerning shooter. Shelling out nearly $100 to make your iron sights glow is a lot to ask, but let’s be honest, we’ve all spent that much money in less productive ways. If you’re serious about making your weapon as effective and capable as it can be, this seems like a worthwhile upgrade.
- Configuration: Rear aperture/front blade sight
- Placement: Must be installed in compatible iron sights
- Adjustments: Sight-dependant
No learning curve required
Compatible with the vast majority of iron sights
Add low-light capability to old-school sights
Tritium rods are always illuminated
Installation isn’t always straightforward
Pricey upgrade for night sights, especially as a backup
Do you have access to nighttime training?
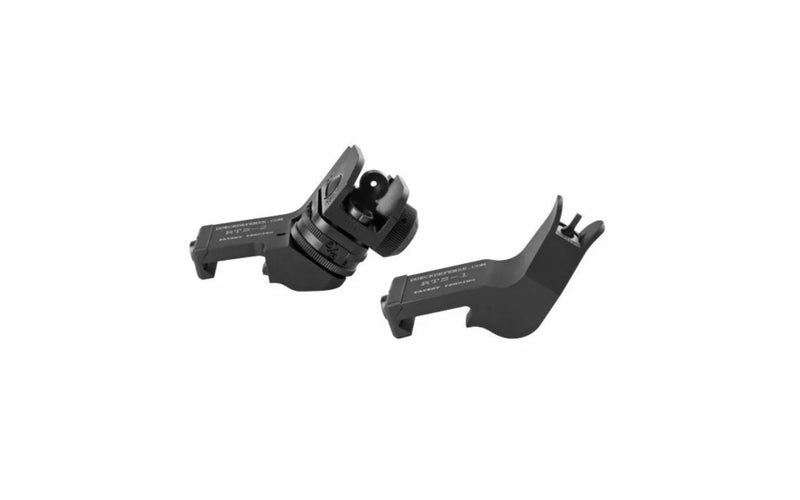
Combining backup iron sights with an optic is nothing new, but most products present an either/or proposition. To use flip-up sights, you might have to remove your magnified optic first. That’s not ideal, and it’s one of the reasons many BUIS are considered a last resort. These SureFire Rapid Transition Sights are different because they’re designed to function alongside your magnified optic to get the best of both worlds.
These sights might hang off the side of your Picatinny rail, but they function just like the A2 sights we know and love. The front sight post can be adjusted for elevation when establishing your zero, and then all on-the-fly adjustments — vertical and horizontal — can be made at the rear. Two apertures are provided for accurate day and low-light shooting. Durable aluminum ensures that these sights will stay operational long after more fragile systems go down.
Shooting well at a 45-degree offset takes practice, but it can be extremely effective. The good news is that these sights feel so similar to classic military iron sights that the learning curve shouldn’t present much of a challenge for experienced shooters. Grab a rest or get into the prone position, and making accurate shots out to 500 yards is totally feasible thanks to the fully adjustable rear sight. Most of the time, though, these will be dialed in for sub-100-yard work and leave longer shots to your magnified optic.
One of the biggest drawbacks of popular magnified optics like LPVOs is slow target acquisition at close distances. These offset sights allow shooters to quickly transition from their magnified optic to open sights with a quick shift of their weapon. We love the capability boost they offer and recommend them to anyone who practices engaging targets at varying distances. If you want to get the most out of your do-it-all rifle or carbine, this is an extremely solid choice.
- Configuration: Rear aperture/front sight post
- Placement: 45-degree right-side offset (fixed)
- Adjustments: Rear windage and elevation, front elevation
Can be used alongside an optic
Elevation adjustment on the rear sight
Quickly transition from your primary optic to your backup sights
Machined from 7075 aluminum
Protrudes from the side of your weapon
Making long-distance shots from a 45-degree cant isn’t that practical
Relatively heavy for backup sights
Style seems to come and go in cycles, and retro gear from the 1990s is making a comeback. One way to enjoy the tools of yesteryear and earn some street cred with the “back in my day” crowd is to use the tried and true A2 carry handle on your AR. This old-school rear sight from UTG is extremely tough and accurate to 500 yards and beyond.
Thumbscrews make installing this sight on your Picatinny rail simple enough, but you should still use a multitool or coin to tighten them down further. That will prevent the carry handle from shaking loose over time. The all-aluminum construction and a protective, matte-black coating make the classic A2 carry handle durable, although significantly heavier than other iron sights. The dual aperture can be flipped forward or back to switch between a tight aperture for accuracy or a wide-open aperture for quick, close-quarters work or low-light shooting. Windage adjustment is made with a hand knob on the side of the sight; elevation is adjustable in predetermined range intervals calibrated for 5.56×45 NATO. This quick, reliable adjustment is a hallmark of the carry handle.
The shooting experience will feel instantly familiar to anyone who’s used an iron-sight-equipped M16 or M4. The basic concept of a peep sight paired with a front sight post is common and easy to get used to. Just remember that this rear sight is sold alone, so you’ll need to mount it on a weapon with a permanent front sight assembly or add a compatible rail-mounted front sight separately. The extra heft of this sight might be a turn-off for some, but I love the ability to make accurate elevation adjustments on the fly. It’s reassuring to know you can reach out to 500 yards or more with a high degree of accuracy without relying on glass or batteries.
This A2 carry handle is priced right in the middle of its A2-style competitors. It’s perfect for anyone who wants to create an old-school AR, but it also has genuine practicality as a marksmanship tool. If you want to hone your skill with iron sight fundamentals, it’s a solid choice.
- Configuration: Tear aperture only
- Placement: Vertical; does not include a front sight
- Adjustments: Rear windage and elevation
Proven design with decades of military and law enforcement use
Extremely durable and easy to use
Fast adjustments for predetermined distances
Thumbscrews can be tightened or removed without tools
Very bulky and heavy for a simple iron sight
A carry handle you aren’t supposed to use for carrying
Takes up a lot of space on your rail
Why you should trust us
At the risk of becoming a stereotype, I actually did qualify on iron sights during my time in the Marine Corps. There are countless modern products I’d take over an old A2 carry handle, but I do appreciate what iron sights offer and I encourage everyone to gain proficiency with them. As my first marksmanship instructor said, if you can master a pistol with iron sights you can figure out any weapon system there is. I’ve also been around long enough to know that if you’re using iron sights in the real world, it’s either because you’re in some kind of competition or the shit has really hit the fan and your primary optic is down for the count. In either case, you can’t afford to rely on something cheap and flimsy. That is the standard used to create this gear guide.
Types of iron sights
Iron sights might all be used the same way, but they take different forms based on how they’re meant to be used. Most sit on top of a barrel or rail, but some fold out of view when they aren’t needed — those are backup sights that only come into play if your primary optic fails. Others extend off the side of the weapon at an angle so you can rapidly switch between them and an optic. Other special features include the ability to see the sights in the dark or innovative takes on the classic front sight post. No matter which you end up buying, learning how to use iron sights is a simple, important step to becoming a skilled marksman.
Traditional iron sights
Britannica estimates that the first iron sights were used as early as 1450. Back then, matchlock muskets were cutting-edge military tech. For hundreds of years, simple pieces of metal fixed to the barrel were as good as sights got. Several shapes have been used, and Military Wiki does a nice job of outlining the more popular variations. You’re most likely to encounter Patridge sights on pistols and may encounter a similar design on many civilian and older military rifles.
As firearm technology improved, iron sights became more sophisticated to take advantage of increased accuracy over greater distances. Aperture — or peep — sights offer improved accuracy and speed, which is why you’ll find them on competition rifles and more modern military weapons. These are usually adjustable for windage at the rear and elevation at the front. Some, like the A2 carry handle, can be adjusted for elevation at the rear as well, which makes adapting to multiple distances much easier.
Backup iron sights
Assuming that the majority of shooters have migrated to some kind of red dot, prism scope, low-power variable optic, or traditional scope, a few even make the leap to night vision or thermal optics. Those systems are fantastic and we highly recommend them, but they aren’t flawless. Most rely on batteries, and all rely on glass (or germanium), which isn’t known to be the strongest material in the world. It’s nice to have a plan B if your primary sighting system goes down at the worst possible moment.
Backup iron sights can keep your weapon in the fight because they don’t require batteries and are extremely difficult to break. They mount to a Picatinny rail and fold flat when not in use. This allows them to fit under your primary optic. If your scope or red dot goes down, you can remove it and deploy the BUIS to retain your combat effectiveness. Considering how little they cost compared to putting your life at stake, buying a set of quality BUIS is a no-brainer.
Special-purpose iron sights
Traditional iron sights and BUIS represent most of the old-school sighting systems you’re likely to encounter, but there are some more specialized options you should be aware of. They may not be everyone’s cup of bottom-shelf whiskey, but there is a time and place.
One of the most common is night sights. These come standard on many pistols, and they can usually be added later if you like, regardless of whether you’re using a rifle, pistol, or shotgun. Fiber optics are probably the most common, and they work great as long as you have enough ambient light to make them glow. Glow-in-the-dark sights are also available. Our favorites use tritium, which doesn’t need to be charged and will glow reliably for 10 to 20 years.
Another variation you’re likely to encounter is offset sights. These mount to your weapon’s top rail like other kinds of iron sights, but protrude 45 degrees to one side (right for right-handed shooters, left for left-handed shooters). This allows them to be deployed at the same time as your primary optic. They allow you to use a scope or LPVO for distance shooting, then rapidly cant the weapon and look through the iron sights for close-up work.
Key features of iron sights
With the exception of the bead sights found on most shotguns, iron sights involve a front sight post or blade, and an open or aperture rear sight. None, one, or both may be adjustable to establish an accurate zero and shift your point of impact vertically or horizontally. By aligning the two, you can control where a round will impact.
Front sight
When you use iron sights, at the front of your barrel there will be a front sight post or blade. Many front sights are fixed, but those on the AR-15 platform are adjustable. A front sight adjustment tool or pointed object can be used to depress a pin, allowing you to rotate the front sight post to move it up or down. This elevation adjustment is only used to zero the weapon because it’s fairly tedious — definitely not something we’d want to do in the heat of battle.
Pistols and some rifles leave the front sight exposed, but our picks use various kinds of hoods to protect the front sight from being knocked out of alignment. These protective structures also reduce glare from the sun, which can distort the way your front sight post appears and throw off your accuracy.
Rear sight
Rear sights commonly come in two forms: open and aperture. Open rear sights are flat with a notch cut into the center for you to look through and align your front sight. Often, this style can be adjusted by physically changing how high it sits off the barrel. Aperture sights — also called peep sights — present a hole to look through. Almost all aperture-style rear sights are adjustable horizontally, and some can be adjusted vertically, as well.
Aim by placing the front sight post in the center of the aperture. Larger apertures are good for quick shots and low-light situations, but they suffer from reduced accuracy. Tight apertures can be extremely accurate but take longer to acquire proper sight alignment and sight picture.
Adjustment
Front sights are often fixed, and those that can be adjusted are only moved when zeroing the weapon. Once you establish a reliable zero, tuck that front sight adjustment tool in your range bag for safekeeping.
Your day-to-day adjustments will take place on your rear sight. All of our picks offer horizontal adjustment that allows you to compensate for wind coming from the left or right. This is done by turning a knob on one side of the sight. Some also allow vertical adjustment to account for changes in elevation. Rather than mils or MOA, these adjustment knobs are marked with numbers indicating the distance at which the sight will be accurate. That all depends on what you’re shooting — our picks are calibrated to 5.56 rounds, and some even specify a particular load, like the M193. Think of that as an analog BDC reticle.
Benefits of iron sights
How much military tech from the 1400s is still in use today? Not much, but iron sights remain as relevant as knives and a well-thrown punch. They take skill and practice to use effectively; but even if they aren’t as capable as modern optics, they can still drive nails at absurd distances.
Reliability
The main reason for adding iron sights of any kind to your weapon is reliability. They’re chunks of metal or polymer, so there is very little that can go wrong with them. Batteries die, glass fogs and breaks, and reticles get knocked out of alignment. A rear aperture and front sight post are damn near impervious to that kind of damage. In fact, Simo Hayha used iron sights specifically because they handled the Finnish winter better than magnified riflescopes and there are estimated to be more than 500 dead Nazi soldiers to attest to his accuracy.
Iron sights are very practical at close range. While they aren’t as fast as a red dot, they certainly allow quicker target acquisition than an LPVO or scope. That’s why so many hunters still use iron sights only on their deer rifles. A set of BUIS paired with a magnified optic serves as an incredibly cheap insurance policy. Offset sights, in many ways, let you get the best of both worlds.
Transferable skill
Shooting with iron sights is by no means a prerequisite to becoming a competent marksman. Still, you’ll have a hard time convincing me that learning to use iron sights won’t make anyone a better shot. If you can master iron sights, you can master just about any weapon system.
Part of this is a matter of practice, and part is mechanical. Because of the way iron sights operate, you can watch as your adjustments physically move the front sight post or rear aperture. Unlike a reticle that appears stationary no matter what you do, a physical sighting mechanism moving from one position to another can be a valuable lesson in the mechanical foundation of marksmanship.
Compatibility with other systems
My last argument in support of adding iron sights to your weapon is this: Doing so isn’t a mutually exclusive proposition. You can mount iron sights without giving up what you already have. Backup iron sights can slip underneath your scope or LPVO. Offset sights can improve your short-range shooting by mounting alongside your scope. If you have a red dot, even more possibilities open up.
Compatible iron sights and red dots can be run simultaneously, using what is called a co-witness setup. There’s more to co-witnessing than sticking two sighting mechanisms on your top rail, so invest 10 minutes of your time in this video from Vortex Optics to get a working knowledge.
Iron sight pricing
At the time of writing, our most affordable pick is the Magpul MBUS II, which checks in at $82. The most expensive is the Ultradyne C4 at $275 on sale on Amazon. Between the two, the sweet spot seems to be right around $100.
How we chose our top picks
The concept of iron sights is simple, but there are multiple reasons to use them. We started by taking different needs into account — backup iron sights, competition sights, night sights, and offset sights for use alongside a magnified optic all had to be represented. We also considered which platforms would be most applicable to our readers. Sure, iron sights are common on handguns, most people who upgrade are probably doing so in favor of a red dot, not a different set of iron sights. If your handgun came with removable sights, they’re probably pretty good to begin with. If you’re in the market for a set of iron sights, you probably own some flavor of AR-15 with a Picatinny rail, so that’s where we focused our attention, being careful to include proven contenders and new challengers.
FAQs on iron sights
You’ve got questions, Task & Purpose has answers.
Q: Are iron sights obsolete?
A: No — fight me in the comments section. There are absolutely better options for the majority of tactical situations, but iron sights fill a role that I don’t see being eclipsed by technology anytime soon.
Q: Will iron sights make me a better shooter?
A: If you’re an excellent shot but only with a red dot, aren’t you just really good at using a red dot? Buying a set of iron sights won’t turn you into a designated marksman overnight, but the skills you develop will make you a more rounded shooter.
Q: Are BUIS important?
A: Backup iron sights aren’t necessary — until they are. Even if you’re trying to build a super-lightweight rifle, being able to fall back on a reliable set of sights that’s not dependent on batteries or glass can be life-saving.
